
م proxy MailStore
مع نشر MailStore Gateway في 4.10.2019، تم إيقاف استخدام MailStore Proxy. الإصدار الحالي الأخير هو 13.2.1.20465؛ لن يكون هناك تطورات إضافية. فريق الدعم الفني لدينا سيساعدك بسعادة في الانتقال إلى MailStore Gateway، ولكن يرجى ملاحظة أننا لن نقدم دعمًا تقنيًا لـ MailStore Proxy خارج هذا الانتقال.


MailStore Proxy
MailStore Proxy server allows e-mails to be automatically archived when sent and received. The advantages and disadvantages of this procedure are discussed in the section Automatic Archiving of Incoming and Outgoing E-mails.
The MailStore Proxy server is available free of charge to all MailStore Server customers and can be downloaded from https://my.mailstore.com/Downloads.
System Requirements
- Windows Vista/2008 or later
- .NET Framework 4.5.1 or later
Procedure
To connect MailStore Proxy to SMTP or POP3 connections, it must be configured to be located between two systems. Depending on the planned archiving strategy, MailStore Proxy can be placed between e-mail clients and an e-mail server (in-house or internet service provider) or between two e-mail servers. MailStore Proxy writes a copy of the sent e-mails to a shared transfer directory along with a report containing transmission details such as sender and recipient.
The MailStore Server archives the e-mails copied by MailStore Proxy from a shared transfer directory. This process can be automated and applied several times a day.
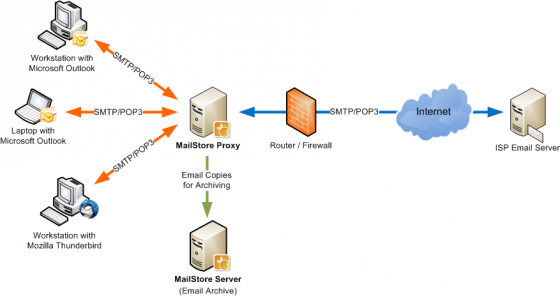
Example: Using MailStore Proxy with an e-mail server located in an ISS
Installation and Configuration of MailStore Proxy
- Download MailStore Proxy from the download section of the MailStore website.
- Install MailStore Proxy on any computer. It is not necessary for MailStore Server to be installed on the same machine, although both should have access to a shared transfer directory or network share.
- After installation, start MailStore Proxy Admin by clicking on the new desktop icon.
- Under Configuration, you can configure MailStore Proxy according to your environment.
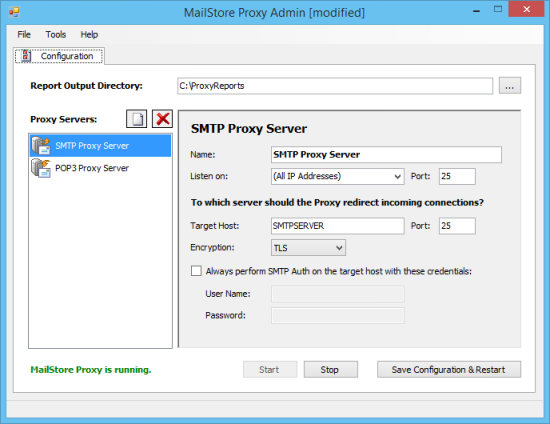
Specifying the Report Output Directory
In the Report Output Directory field, specify which directory MailStore Proxy should write the transmission reports to. For MailStore Server to archive the e-mails, it must have access to this directory. The directory is valid for all proxy servers (SMTP and POP3).
Adding or Removing Proxy Servers
After installing MailStore Proxy, there is already an example configuration for an SMTP proxy server and a POP3 proxy server. If you need additional proxy servers, for example, if you are using e-mail servers from different internet service providers, you can add or remove additional proxy servers by clicking on the appropriate button next to the Proxy Servers label.
Configuring the SMTP Proxy Server
To configure an SMTP proxy server, follow these steps:
- Click on the name of the proxy server you want to configure in the Proxy Servers list. Immediately after installing MailStore Proxy, there is a configurable example named SMTP Proxy Server according to your environment.
- In the Name field, you can enter a meaningful name for the SMTP proxy server. This is especially useful when multiple proxy servers are configured. Technically, this has no effect on the proxy server.
- Under Listen on, specify which IP address of MailStore Proxy should listen for incoming connections. The Port field specifies the port that MailStore Proxy must listen on to forward the incoming connections to the Target Host. The default port is 25. If another e-mail server is running on the computer and it is not listening on port 25, the default option should not be changed. The communication with MailStore Proxy can be unencrypted or encrypted using StartTLS. SSL connections, usually referred to as SMTPS, are not currently supported by MailStore Proxy.
- In the Target Host field, specify which SMTP server the incoming connections should be directed to. This is usually the internet service provider's SMTP server or an in-house SMTP server. If the SMTP server's SMTP port is different from the standard port, change the Port value (25).
- If the connection to the external SMTP server requires encryption, the type of encryption can be selected under Encryption. Whether the connection to the target host is encrypted is not dependent on whether the MailStore Proxy connection is encrypted. Note: SSL connections are usually established on port 25 rather than port 465. Please make sure to change the Port value accordingly.
- If the external SMTP server requires authentication, you can specify the login credentials in the User Name and Password fields. These values are used when connecting to the target host. By filling in these fields, you do not need to configure login information on each workstation in your network. Important note: If you store the login credentials for your SMTP transmission on the SMTP proxy server, you should not make the SMTP proxy server accessible from the internet; because this would create an open relay server that can be quickly misused by spammers.
- After configuring the settings, click Save and Restart to restart MailStore Proxy.
Configuring the POP3 Proxy Server
- Click on the name of the POP3 proxy server you want to configure in the Proxy Servers list. Immediately after installing MailStore Proxy, there is a configurable example named POP3 Proxy Server according to your environment.
- Under Listen on, specify which IP address of MailStore Proxy should listen for incoming connections. The Port field specifies the port that MailStore Proxy must listen on to forward the incoming connections to the Target Host. The default port is 110. If another e-mail server is running on the computer and it is not listening on port 110, the default option should not be changed.
- In the Target Host field, specify which POP3 server MailStore Proxy should direct the incoming connections to. This is usually the internet service provider's POP3 server or an in-house POP3 server. If the POP3 server's POP3 port is different from the standard port (110), change the Port value. The communication with MailStore Proxy can be unencrypted or encrypted using StartTLS. Incoming SSL connections, usually referred to as POP3S (TCP port 995), are not currently supported by MailStore Proxy.
- If the connection to the target host needs to be encrypted, the encryption type can be selected under Encryption. Whether the connection to the target host is encrypted is not dependent on whether the MailStore Proxy connection is encrypted. Note: SSL connections are usually established on port 110 rather than port 995. Please make sure to change the Port value accordingly.
- After configuring the settings, click Save and Restart to restart MailStore Proxy.
Integrating MailStore Proxy into Your E-mail Environment
Depending on your archiving strategy, there can be two different locations in your e-mail environment that require reconfiguration.
Configuring E-mail Clients
If MailStore Proxy is located between your e-mail clients and an e-mail server (in-house or internet service provider), replace the outgoing e-mail server (SMTP) and incoming e-mail server (POP3) with MailStore Proxy's DNS host name or IP address. If necessary, change the ports in the Listen on field of your SMTP or POP3 proxy server to match the appropriate ports.
Configuring the E-mail Server
Is MailStore Proxy located between two e-mail servers, for example, between your company's internal network and an internet service provider? Ensure that all outgoing e-mails from your e-mail server are sent to MailStore Proxy. This option is often found under "Smarthost" or "Outgoing Relay" in your e-mail server's configuration options. Fill in the DNS host name or IP address of the MailStore server and set the appropriate ports in the Listen on field of your SMTP or POP3 proxy server.
If your e-mail server is retrieving the contents of POP3 mailboxes from your internet service provider's e-mail server, make sure that the connection is set up to MailStore Proxy in the future. For more information on how to change these settings, please refer to your e-mail server's user guide.
Configuring MailStore Server
Before configuring MailStore Server, ensure that there is a MailStore user account for each user whose e-mails are to be archived on the MailStore Proxy server. For more information, please refer to the User Management section.
Important Notice: In user management under Properties, it is mandatory to specify the e-mail address for each user. This is the only way to ensure that e-mails in the archive are assigned to the correct users. If the POP3 username does not match the user's e-mail address, the username should be added separately.
Please proceed as follows:
- Start MailStore Client on the computer where MailStore Server is installed. Log in to MailStore Client as an administrator.
- Click on Archive Email and then click on MailStore Proxy.
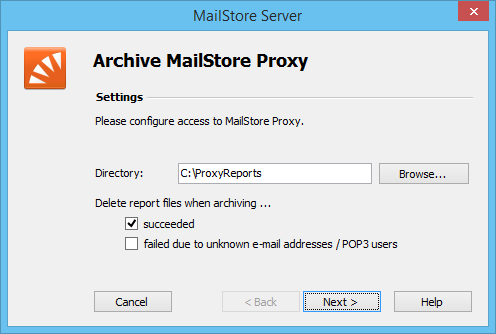
- Select the Report Output Directory specified in the proxy configuration.
- In the Delete report files during archiving section, check the box to confirm that the archiving process has been sufficiently tested. Even if this setting is disabled, MailStore Server will not archive duplicate e-mails.
- In the Delete report files during archiving section, check the box to delete report files when archiving fails due to unknown e-mail addresses / POP3 users after all users' e-mail addresses have been verified (in User Management, under Properties). Background: E-mails received from any MailStore proxy server that cannot be assigned to a MailStore user remain in the proxy server's output directory. The option to delete report files when archiving fails due to unknown e-mail addresses / POP3 users helps minimize the amount of such data.
- Click Next.
- In the final step, a name can be specified for the archiving profile. After clicking Finish, the archiving profile is listed under Saved Settings (Profiles) and can be executed immediately if desired.
Starting the Archiving Process
Manually Starting the Archiving Process
On the start page of MailStore Client, click Archive Email (E-mail) and select the appropriate archiving profile from the list under Saved Profiles. Click Run. After executing the archiving process, a protocol is generated. It contains information about the volume of archived e-mails and any possible errors that may have occurred.
This process can be repeated as many times as the user wants. MailStore only archives e-mails that have not yet been stored in the relevant user archive.
Automating the Archiving Process
In addition to being executed manually, archiving tasks can also be automated. Additional information on this topic is available in the section Automating the Archiving Process.